What are Primers
Primers are professional image transformation tools, designed for acquisition and post production, achieving superior motion imaging performance.
Made through custom designed methodology which includes thorough analysis and optimisation of camera’s response with multiple QC tests, they assure quality and consistency in digital imaging.
Each digital camera has multiple subtle imperfections in its response, due to its particular sensor, processing and base colour science properties jointly affecting the final outcome. Primers address practically all the imperfections, by transformation “priming” of the imagery, achieving superior final outcome in technical parameters and visual aesthetic.
Primers are:
a) colour space transformation tools
b) gamma transformation tools
AND
c) colour correction and unification tools
About the project
Primers project was started at the end of 2015 by a few industry professionals, pursuing technical and aesthetic improvements in imaging for own production and post production requirements. The ongoing challenges in colour performance and imperfections, many inconsistencies and dramatic camera differences, many of which were highly problematic during shoots or in post production motivated the venture into the unknown.
Combining the experience in broadcast and cinema, camera support, DIT, multiple production and post production fields, with the experience in other domains, project was focused on research in digital imaging and development of tools & routes to get the best possible imagery out of digital cameras. Removing the limitation of “baked in” video profiles, wider adoption of log & wide gamut recording (& RAW) with widespread support of 3DLUT transformation tools allowed technical basis for what we called “image optimisation”.
We went to look how deep and how far we can shape the image within a single transformation so once it gets to the monitor / post it is already “as it should be”.
We designed a) custom camera analysis workflow, b) custom image optimisation workflow and c) custom image shaping/response target as a goal. During the course of 6 years, in passionate and relentless pursuit of imaging excellence all three parts were improved multiple times which meant updating each Primers sets to new generations. Colour science is a highly complex game of juggling multiple variables. As the project evolved, criteria rose and goals multiplied which meant having to overcome many challenges.
With some cameras you will see this good while that is not good. Too much of this, too little of this. From one issue to another. Too magenta, too green/yellow. Washed out / too slammed. Pinkish skin tones, magenta skin tones, orange skin tones, yellow skin toes. Problematic shadows, problematic highlights. Etc, etc.
We set out to see if it was possible to make it all good. It was.
One by one, we improved multiple image parameters compared to those of imagery achieved with standard conversion routes. Today we support many cameras, enabling every Primers user to achieve superior imaging results. In many cases dramatically superior to camera makers´or software makers´default conversions.
How it works
Three main image stages predetermine final image result, excluding creative image shaping and display properties:
Stage 1) Camera sensor & electronics performance
Stage 2) Log/wide gamut base colour science mapping from RAW
Stage 3) Standard conversions from base log / wide gamut colour science
Each of three stages bring specific image imperfections and with each consecutive step image properties cumulatively deviate from visually referent and natural, either through judgement calls of camera maker or colour science principles of every imaging pipeline stage and process.
This is where Primers step in.
We take into account the results of the first two stages (sensor response + base colour science which maps that response into colour values), remove their combined imperfections and bring the image into superior state within a custom designed third stage. Which means that a single transformation a) transforms the image from log basis and b) “re-calibrates” it.
This requires treating every camera/sensor differently and making specific sets of conversions for each camera model.
Primers are specific, in-depth, per-sensor and base colour science designed image response optimisations, which cannot be compensated by in-camera settings or typical colour correction. Inside the transformation to standard working colour space & gamma Primers reach deep into the image values and remap them in an optimal way, modifying image properties beyond the practical reach of post production tools. This also means going even beyond the visibility threshold, to the extent of taking days and weeks of work and back and forth for barely visible improvements.
Compared to Primers, every standard technical conversion seems as a “look”, either enhancing, decreasing, deviating or damaging image properties. Primers take care of the technical conversion part and creative look is left to the Creative.
Using Primers the DoP and colourist can invest more time and focus on the creative part, with more accurate, stable and higher quality visual feedback and image basis. DITs also benefit in quick, practical and reliable workflow for on-set dailies
Image Philosophy
Primers project is based on own image philosophy, defined by four main sets of principles and criteria.
1) Natural imagery
The most natural image possible. Visually referent. No “digital feel”. No creative “look”.
What you see is what you get. What you will get is what you see.
With sensed aesthetic this makes the best connection to the image during shooting, best insight into cinematographic judgement calls and gives a clean neutral slate in post for creative look design.
2) Technical performance
Most stable, normalised, consistent, technically accurate image response (which meets the criteria under 1).
This is important for best image shaping results because once the response has been “ironed” further creative work will give more consistent and higher quality results. Once you start pushing and pulling, everything behaves better with least image deterioration. Starting from basic tonal balance. This also means superior results of final transformations for varying deliveries.
Immense effort has been invested to combine 1) & 2) ensuring quality levels and technically correct yet natural and organic-feeling results while keeping the tonal neutrality.
3) Unified colour
Instead of attempting to match one camera image to another (and output conversion looks from camera makers) we chose to “calibrate” their imagery to the same reference. Our reference.
The reference which meets all the criteria set by 1) & 2)
General look and feel, image depth, “thickness”, colour “vividness”, “punch”, organicity etc, the first visible/sensible properties are taken care of. Some very specific hues, predetermined by sensor performance may vary a bit. Forcing those would risk pushing some image parameters and going against technical priorities under 2) but overall look goes well for continuity, which was the goal.
4) Workflow
Tools had to be intuitive, simple, practical and widely usable.
This is why we chose 3DLUTs as conversions in which to embody the transformations. Typically 3DLUTs are used for technical conversions from colour spaces & gammas to another, monitor calibration and as pre-designed creative look image shaping tools.
In early 2016 we invented another usage, which we call “image optimisation”, and created tools which achieve technical conversion AND specific input-referred calibration / colour correction. With the simplicity of usage on monitors, recorders and in post production.
The Process
Each camera first passes through our testbed, which consists of few set of tests which we designed, in multiple stages and types.
We made custom charts for this purpose, as we found standard ones as either insufficient or unreliable. Hundreds of test images are taken with each camera, which pass through thorough analysis to examine each sensor response in depth. Combining the results of multiple types of tests and hundreds of test images, gathered information is used to establish most comprehensive and objective basis for the insight into camera performance.
Based on the insight, sensor-specific transformations are designed which meet the most criteria. These are then applied on hundreds of test images from various scenarios, then further inspected and further optimised. This process goes back and forth many times until ALL the image aspects form our list are taken care of and imagery is optimised as much as possible.
During and after the transformation design and optimisation process, there is quality inspection making sure that image deterioration is avoided and technical properties are kept at high level.
Accomplished
- Custom multi-stage & multi-level camera analysis testbed & workflow
- Custom colour response & contrast design, visually referent and technically superior
- Custom image transformation design process achieving high quality conversion
- Colour unification of different cameras, meeting the same reference through our Unified Colour Philosophy
- Improved workflow speed, intuitiveness and practicality and quality of results
- Implementation and usability – embodied as 3DLUTs so applicable as conversion tools across the production domain
Improvements
- Superior colour performance: accuracy, stability, harmony, separation, consistency
- Superior image depth, definition and dimensionality
- Superior utilisation of available dynamic range
- Superior highlight and shadow handling
- Fully natural image aesthetic and removal of “digital” feel from a digital camera
- Normalised, stabilised and harmonised tonal properties
- Minimised noise and stabilised image texture
- Incorporated Unified Colour Philosophy
Usage scenarios
Primers are embodied into standard 3DLUT .cube form so they can be used across scenarios, whether in cameras, monitors and recorders or software tools.
- Before the shoot > to check the results on test material and consider camera and light setup
- On the shoot > to get more accurate feel of the final result and expose according to visual feedback
- On set after the shoot > for high quality and practical dailies creation
- In post-production > for highest quality colour correction basis
Primers Standard Edition are designed for compact cameras making the most of 8 bit material.
Primers EQX are designed for 10bit+ material and typically log material and target the utmost.
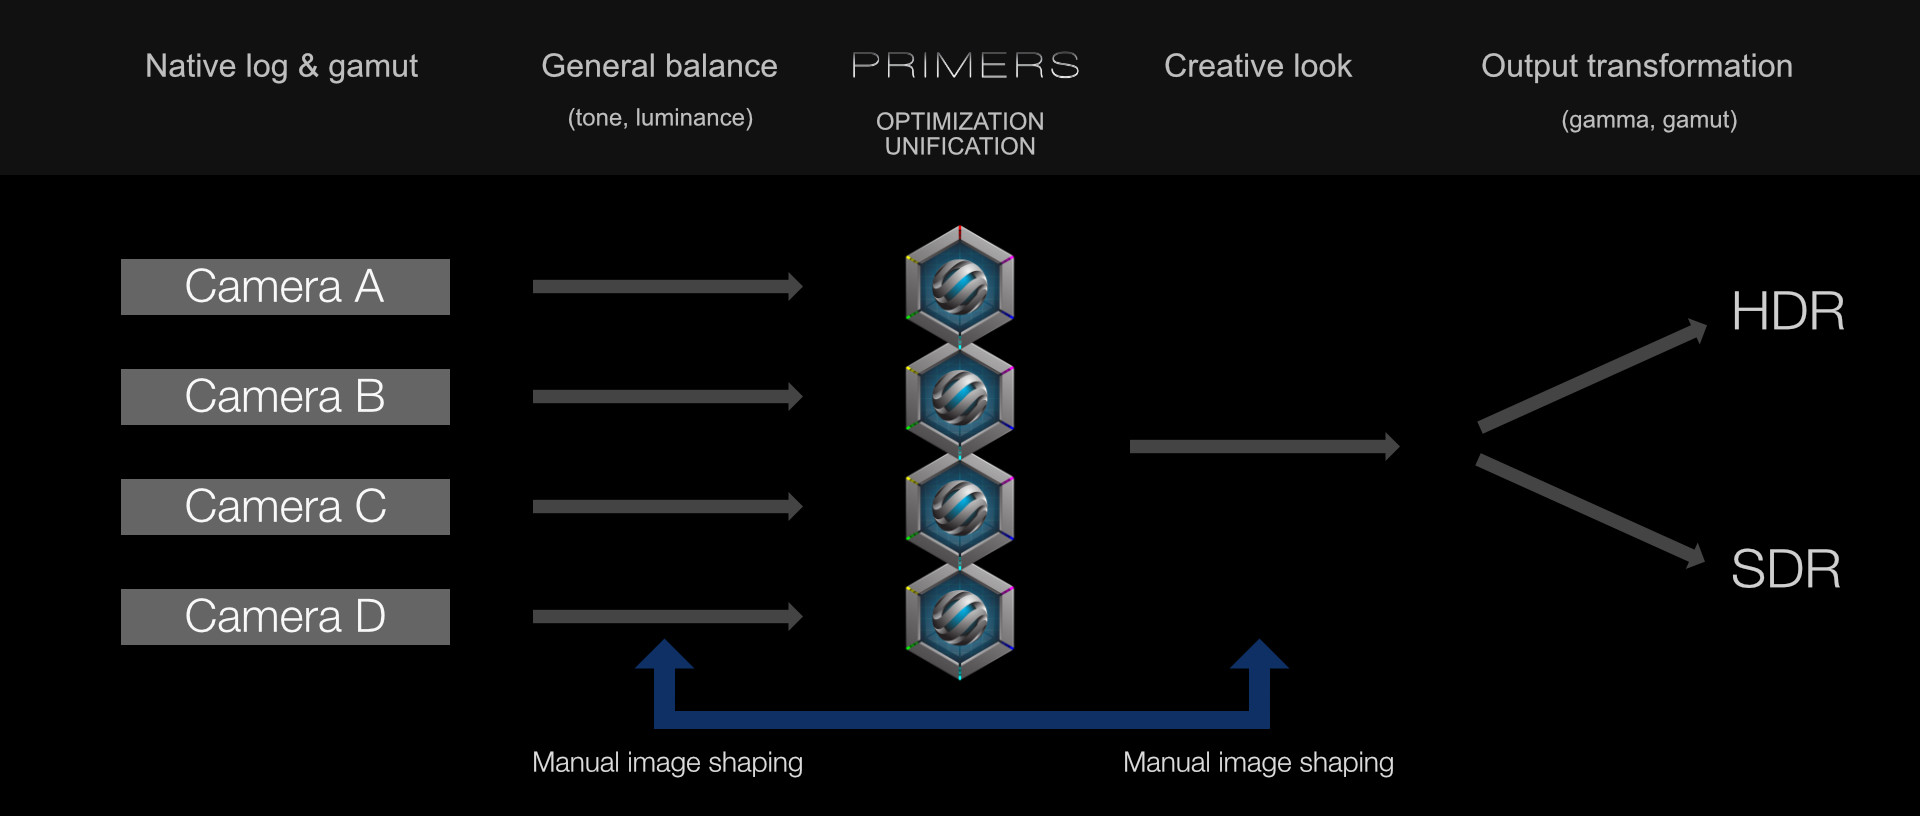
Workflow
Primers are designed to sit in the middle of post-production workflow signal chain. They can be seen as primary colour correction tools which incorporate base input transformation. Instead of manual image shaping from log Primers shape the base image in greater precision.
It is crucial that general tonal balance is done on log basis, before the transformation step of the Primer, while previewing the image through the Primer.
Once the native log image is “loaded” into the Primer, Creative has the ability to choose how the image will pass through it, in terms of tonal balance and mid grey positioning. Combining manual tonal balance with Primer transformation, base colour correction is complete.
After the Primer optimises and unifies the colour response further creative work benefits from a higher quality basis and unified creative look application.
Workflow parameters
- Primers should be used for a specific camera/sensor and input base colour science, gamma and gamut
- Any colour/contrast software “auto” functions, such as chart matching or matching plugins must be avoided.
- It is always recommended to use highest (practical) recording quality.
- LUT interpolation in software should be set to tetrahedral.
- Primers EQX require 10 bits minimum, 12 bits are advisable.
- For first light (base colour correction) tonal balance and overall signal positioning in luminance (offset) should be done before the Primer in the signal chain, to get the most stable and accurate basis.
- Saturation, contrast, qualifiers and tonal particulars manipulation should be avoided before the Primer. Once the image is optimised this will yield superior results post LUT.
- For most “log-like” grading feel we designed most flat Primer 01 Base
SDR & HDR
Primers are input-referred transformation tools and as such do not lock the image into display output.
For standard dynamic range displays non colour-managed workflow works fine with 709 output.
For P3 monitors same gamut should be set at software output.
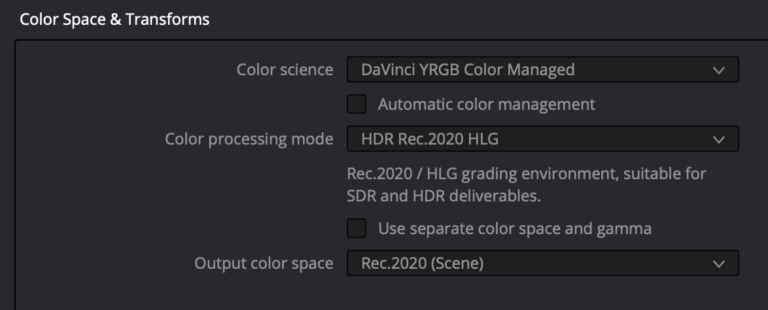
For HDR we found best results with Resolve with these output settings and HDR displays set to HLG & 2020 gamut.
The Logic of Primers
Primers set is designed with acquisition and post in mind, meeting multiple parameters to cater both parts of the domain and cover most scenarios with best results.
For acquisition,
Each Primer shows full dynamic range and gamut of the camera, with proper visual feedback for best exposure judgement calls, implementing optimisations for visually referent imagery. What you see is what you get.
How they map contrast is designed for different shooting scenarios regarding light design, look intent and scene’s contrast and dynamic range.
For post production,
Each Primer shares same properties related to accuracy, stability and organicity to assure adequate image behaviour and intuitive worry-free workflow. They are set in practical contrast distribution increments for different scenes AND creative approaches, with visually referent tonal response and fully normalised, harmonised and stabilised image properties for best quality image shaping.
Luminance:
Neither highlight nor shadow extremes are designed to land on 0 % black and 100 % white and are not targeting exact values. This is a judgement call made on prioritising gamma curve design which a) avoids fully slammed image and leaves best visual feedback of recorded dynamic range; b) avoids hard clip assuring smooth and natural transition to luminance extremes and c) leaves a bit of headroom for more practical post production with very organic contrast feel and superior image behaviour in image shaping.
For monitoring and highlight clipping check based on a waveform or using zebras, whites are typically around 95% but it is best to re-check for each log and do overexposure test to see where clipping flat line ends. Highlight clipping is not a problem with Primers, they make sure it looks natural and film-like and motivate “ETP” or “Expose-To-Priorities”. So you can focus on what you are shooting.
Saturation:
Saturation compression within the gamut is also our own design meeting multiple visual and technical parameters, assuring a) technical superiority in post production and b) natural looking fallofs and organic image feel both in SDR and HDR presentation.
Primers set
Primers set consists of 5 Primers.
From 01 to 04 all Primers meet referent mid grey for camera maker’s log and same exposure.
Set starts from 01 Base which is the most flat and goes towards 04 Punch which has highest contrast.
04 Punch can be considered as “fully developed” and is typically closest in feel of general contrast to standard camera makers’ 3DLUT for their log, with few specifics in highlights and shadows behaviour which are our own design. Being “fully developed” in terms of contrast it also means achieving maximum saturation values in terms of working colour space.
Last Primer in the set 05 DMax is about half of stop pushed down, which gives thicker image and motivates a bit higher exposure to achieve same mid grey levels. We chose the exposure offset which is negligible in the context of pushing the image or the need for more light/exposure to compensate yet achieves a noticeable difference, further harvested by Primers.
- 01 Base – Most flat, will show most open shadows and highlights, we chose contrast/ luminance distribution which is a) sufficient to see a proper image on set with most dynamic range visibility and b) sufficiently flat for a starting point for even the most demanding grade.
- 02 NTR – Step higher contrast than 01 Base where image dimensionality and shadows and highlights start to define more, while still being very natural and lower contrast with very smooth highlights and shadows. We chose it as a golden middle for monitoring and post. For both SDR and HDR.
- 03 Vivid – Step higher contrast from NTR and step lower from 04 Punch, adding more compression and volume while being a bit more flat with more open shadows and highlights than 04 Punch.
- 04 Punch – Full contrast with most compressed shadows and highlights and most defined image.
- 05 DMax – Similar contrast and falloffs to 03 Vivid but pushed down about half a stop achieving increased density and overall thicker image feel, high luminance saturation holds more, more image information reserved for shadows and better noise performance. Naming is hommage to film.
Benefits
1) Superior imaging performance
2) Natural image aesthetics
3) More practical and reliable shooting
4) Accurate on-set monitoring, spot-on exposure
5) Same transformations for monitoring & post, reduced workflow variables & risks, what you see is what you get. Exactly.
6) High quality and faster set dailies
7) High quality post production
8) Maximum utilization of sensor gamut & DR (Log origin & Primers EQX for 10 bit+ cameras)
9) Unified colour performance across cameras and brands with dramatically easier camera matching
10) Technical simplification and unification of workflow with more time and focus left for creative work